조만간 Verilog 강좌를 시작할 예정인데, 그에 앞서 블로그에 Verilog Syntax Highlighter를 설치하였습니다.
먼저 Syntax Highligher가 뭔지 보여드리면,
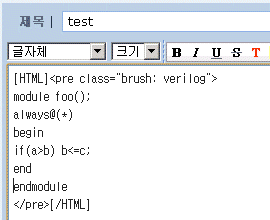
글을 쓸때 요렇게 입력하면,
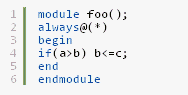
요렇게 예쁘게 보여주는 것입니다.
SyntaxHighligher는 [이곳]에서 다운받으시면 됩니다. 저는 최신버젼인 3.0.83을 받았습니다.
여러가지 언어를 지원하지만 Verilog는 기본적으로 지원되는 언어가 아닙니다. 하지만, Tyreal이란 분이 친절히 [Verilog용 Brush]를 만들어놓았습니다. 모두 저장해둡니다.
FTP로 두 파일을 모두 블로그에 올려두고, Telnet/rlogin으로 블로그 계정이 접속하여 압축을 풉니다.
편의상 tt(테터툴즈 기본 디렉토리)/plugins/SyntaxHighlight 에 압축을 풉니다.
$ cd tt/plugins
$ unzip syntaxhighlighter_3.0.83.zip
$ mv syntaxhighlighter_3.0.83 SyntaxHighlight
$ cd SyntaxHighlight
$ ls
LGPL-LICENSE MIT-LICENSE compass index.html scripts src styles tests
$ unzip syntaxhighlighter_3.0.83.zip
$ mv syntaxhighlighter_3.0.83 SyntaxHighlight
$ cd SyntaxHighlight
$ ls
LGPL-LICENSE MIT-LICENSE compass index.html scripts src styles tests
Verilog용 Brush파일 shBrushVerilog.js를 scripts 디렉토리에 저장합니다.
관리자로 접속하여 ‘스킨관리’메뉴에서 skin.html을 수정합니다.
</head> 바로 앞에다가 아래 내용을 추가합니다.
<!-- Include required JS files -->

<script type="text/javascript"

src="/tt/plugins/SyntaxHighlight/styles/shCore.js"></script>


<!--

   At least one brush, here we choose JS. You need to include a brush

for every

   language you want to highlight

-->

<script type="text/javascript"

src="/tt/plugins/SyntaxHighlight/scriptss/shBrushJScript.js"></script>


<!-- Include *at least* the core style and default theme -->

<link href="/tt/plugins/SyntaxHighlight/styles/shCore.css"

rel="stylesheet" type="text/css" />

<link href="/tt/plugins/SyntaxHighlight/styles/shThemeDefault.css"

rel="stylesheet" type="text/css" />
그리고 skin.html의 제일 아래부분 </body>바로 앞에 아래 내용을 추가합니다.
<!-- Finally, to actually run the highlighter,

you need to include this JS on your page -->

<script type="text/javascript">

    SyntaxHighlighter.all()

</script>
그리고 글을 쓸때 Verilog 코드의 앞뒤에 <pre class=”brush:verilog”>와 </pre>를 입력하면 됩니다.